
_edited.png)
Armhole Gaping
This adjustment removes excess fabric around the armhole so the bodice sits smoothly and securely.
It prevents the armhole from collapsing, bubbling, or standing away from your body.
A well‑shaped armhole improves comfort, movement, and the overall look of the garment.
What this adjustment is
If you’re unsure how much to remove, start small. Your toile will show you exactly how much your body prefers.
An armhole gaping adjustment removes a small amount of length from the front armhole edge. This is usually done by:
adding a small dart, or
rotating that dart into an existing dart or seam
The goal is to reduce the armhole length without changing the overall fit of the bodice.
When you need this
adjustment
You may need this adjustment when:
the armhole stands away from your body
soft folds appear between the bust and the armhole
the armhole collapses outward when you move
the neckline and bust fit well, but the armhole feels loose
the gaping only appears on sleeveless versions of the pattern
This adjustment is especially helpful for:
sleeveless bodices
tank tops and shells
woven dresses
wrap bodices
garments with bust darts or princess seams
Why this issue happens?
Armhole gaping occurs when the armhole edge is longer than your body requires. This can happen when:
your bust shape is fuller or smaller than the draft
your upper chest is narrower than the pattern expects
the armhole stretches during sewing (common in wovens cut on the bias)
removing the sleeve changes the fit of the armhole
the pattern’s dart placement doesn’t match your proportions
A small refinement here is very common — especially in sleeveless garments.
How Much to Remove
Pinch out the excess at the armhole on your toile. Measure the amount you pinched — usually 1–2 cm (⅜–¾"). This is the amount you’ll remove from the pattern.
If the gaping is only at the top of the armhole, remove the amount there. If it’s lower, remove it closer to the bust.
How to Fix a Gaping Armhole on a Darted Bodice


Use this method when your bodice has a bust dart.
It removes the extra armhole length by transferring it into the existing dart, keeping the outside of the bodice smooth and dart‑free.

1. Mark the excess on your toile
Pinch out a small dart at the armhole so the fabric lies flat.
Mark the dart legs on to your pattern and measure the distance between them — this is the amount you’ll remove.
Also note how far the dart sits from the bottom of the armhole.

2. Draw your adjustment lines
On the front bodice pattern:
Draw a line through the centre of the bust dart to the bust apex.
Draw a second line from the bust apex through the centre of the dart that you have marked.
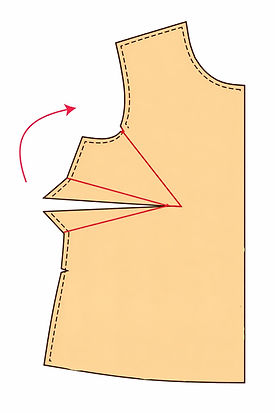
3. Cut and rotate
Cut out the armhole dart completely.
Cut along the line through the bust dart, leaving a tiny hinge at the bust apex.
Swing the upper section upward and inward to close the armhole dart.
This transfers the excess into the bust dart.

4. Trace a clean pattern piece
Trace around the adjusted pattern:
Redraw the bust dart using the original dart legs
True the dart extension so both legs are the same length
Smooth the armhole curve so it flows naturally

1. Transfer the dart from your toile
Draw the dart you pinned on your muslin directly onto the front pattern piece in the same position.

2. Fold the dart closed
Fold along the centre of the dart
Bring the two dart legs together
Tape the dart closed
The paper won’t lie perfectly flat — and that’s completely fine. This simple fold removes the excess length from the armhole.
3. Smooth the armhole
Flatten the pattern as best you can and redraw the armhole curve so it flows smoothly across the folded area.
How to Fix a Gaping Armhole on a Darted Bodice
Use this method when your bodice has a bust dart.
It removes the extra armhole length by transferring it into the existing dart, keeping the outside of the bodice smooth and dart‑free.
1. Mark the excess on your toile
Pinch out a small dart at the armhole so the fabric lies flat.
Mark the dart legs on to your pattern and measure the distance between them — this is the amount you’ll remove.
Also note how far the dart sits from the bottom of the armhole.
2. Draw your adjustment lines
On the front bodice pattern:
Draw a line through the centre of the bust dart to the bust apex.
Draw a second line from the bust apex through the centre of the dart that you have marked.
3. Cut and rotate
Cut out the armhole dart completely.
Cut along the line through the bust dart, leaving a tiny hinge at the bust apex.
Swing the upper section upward and inward to close the armhole dart.
This transfers the excess into the bust dart.
4. Trace a clean pattern piece
Trace around the adjusted pattern:
Redraw the bust dart using the original dart legs
True the dart extension so both legs are the same length
Smooth the armhole curve so it flows naturally
1. Transfer the dart from your toile
Draw the dart you pinned on your muslin directly onto the front pattern piece in the same position.
2. Fold the dart closed
Fold along the centre of the dart
Bring the two dart legs together
Tape the dart closed
The paper won’t lie perfectly flat — and that’s completely fine. This simple fold removes the excess length from the armhole.
3. Smooth the armhole
Flatten the pattern as best you can and redraw the armhole curve so it flows smoothly across the folded area.
Before you cut fabric, check
Before cutting your toile or final fabric, check:
Have you measured the amount of gaping on your toile?
Are you removing the excess at the correct point on the armhole?
Will the adjustment affect a dart or princess seam?
Have you stabilised the armhole if your fabric stretches easily?
Common mistakes to avoid
Removing too much length
Ending the dart too close to the bust apex
Forgetting to adjust the facing
Not smoothing the armhole curve after taping
Ignoring bias stretch during sewing