
_edited.png)
Blending Between Sizes
Blending between sizes means drawing a smooth, continuous line between two or more size outlines on a multi‑sized pattern so the garment reflects your unique proportions. It is a direct pattern adjustment, done before you cut your toile, so your first test garment already starts closer to your true shape.
What this adjustment is
Start with the measurement that most affects the garment type:
Bust for tops and dresses
Hips for skirts and trousers
Blending is the process of choosing different sizes at different points on a pattern (for example, bust, waist, and hips) and connecting them with a smooth, gradual line. It customises the pattern to your proportions without altering the construction or design.
This is not a “test” adjustment — it is the actual pattern modification you make before cutting fabric.
When you need this
adjustment
Blending is needed when your measurements fall into different sizes on the chart. This is extremely common.
You may need to blend when:
- Bust and waist differ?
- Waist and hips differ.
- Top and bottom differ.
- Your proportions don’t match the pattern’s assumptions.
- You want a more accurate starting point before fitting.
Why this issue happens?
Pattern sizes increase in predictable increments.
Real bodies don’t.
Blending is simply a way of:
honouring natural variation in proportions
matching the pattern to your curves
avoiding unnecessary fitting work later
creating a more accurate starting point for your toile
It’s not a correction — it’s a customisation.
Example Scenarios
Dressmaking
Bust = 14, Waist = 12, Hips = 14
→ Blend in at the waist, then back out at the hips.
Trousers
Waist = 10, Hips = 14
→ Start at size 10 at the waist, curve out to 14 at the hip.
Shirts/Jackets (men’s)
Chest = M, Waist = L
→ Blend from M at the chest down to L at the waist.
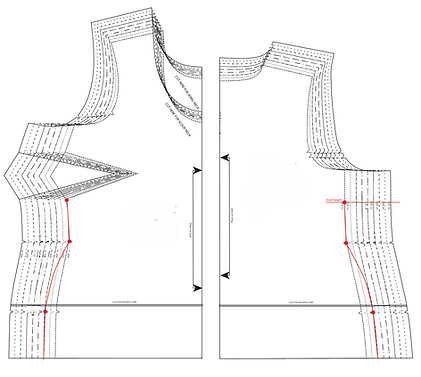
How to blend between sizes


Here’s how to blend between sizes on your pattern so it follows your measurements smoothly.

1. Identify your sizes
Use the size chart to find your bust/chest, waist, and hip sizes.
Beginner tip: Circle or highlight your sizes on the pattern envelope or PDF size chart so you don’t lose track of them.

2. Find the nested size lines on the pattern
Multi‑sized patterns have several outlines printed on top of each other. Locate the lines that match your sizes at each key point.
Use a pencil to lightly mark:
your bust size at the bust line
your waist size at the waistline
your hip size at the hip line
any other relevant levels (e.g., upper arm, thigh)
Beginner tip: Highlight these key points so they stand out clearly before you start drawing.

3. Draw your new seam line
Using a pencil, connect your marked points with a smooth, curved line that follows the general shape of the original pattern line.
You’re not drawing straight lines between dots — you’re redrawing the pattern’s natural curve, just in a slightly different place.
Tips for success:
Follow the shape of the original line
Use a French curve or pattern ruler
Keep the line gradual and flowing
Avoid sharp corners or sudden changes
Draw lightly first, then firm up the line once you’re happy
This new line becomes your personalised size.
4. Blend both front and back pieces
Side seams must match in both length and shape.Repeat the same blending on the front and back pieces so they sew together cleanly.
Beginner tip: Place the front and back pieces together (paper against paper) to check the curves align.

5. Check intersecting pieces
If your new seam changes the length or shape of any edges, adjust the matching pieces too:
waistbands
facings
collars
pockets
yokes
Anything that attaches to your new seam must match your new line.

6. Cut the pattern along your new blended line
Once you’re happy with your pencil line, cut along it. This is now your actual pattern edge — the one you’ll use to cut your fabric.
How to blend between sizes
Here’s how to blend between sizes on your pattern so it follows your measurements smoothly.
1. Identify your sizes
Use the size chart to find your bust/chest, waist, and hip sizes.
Beginner tip: Circle or highlight your sizes on the pattern envelope or PDF size chart so you don’t lose track of them.
2. Find the nested size lines on the pattern
Multi‑sized patterns have several outlines printed on top of each other. Locate the lines that match your sizes at each key point.
Use a pencil to lightly mark:
your bust size at the bust line
your waist size at the waistline
your hip size at the hip line
any other relevant levels (e.g., upper arm, thigh)
Beginner tip: Highlight these key points so they stand out clearly before you start drawing.
3. Draw your new seam line
Using a pencil, connect your marked points with a smooth, curved line that follows the general shape of the original pattern line.
You’re not drawing straight lines between dots — you’re redrawing the pattern’s natural curve, just in a slightly different place.
Tips for success:
Follow the shape of the original line
Use a French curve or pattern ruler
Keep the line gradual and flowing
Avoid sharp corners or sudden changes
Draw lightly first, then firm up the line once you’re happy
This new line becomes your personalised size.
4. Blend both front and back pieces
Side seams must match in both length and shape.Repeat the same blending on the front and back pieces so they sew together cleanly.
Beginner tip: Place the front and back pieces together (paper against paper) to check the curves align.
5. Check intersecting pieces
If your new seam changes the length or shape of any edges, adjust the matching pieces too:
waistbands
facings
collars
pockets
yokes
Anything that attaches to your new seam must match your new line.
6. Cut the pattern along your new blended line
Once you’re happy with your pencil line, cut along it. This is now your actual pattern edge — the one you’ll use to cut your fabric.
Once you’ve read through the steps, it can really help to see the process in action.
🎥 The video below walks you through blending between sizes on a real pattern so you can follow along with confidence.
Before you cut fabric, check
1. Are the side seams smooth and continuous?
2. Do front and back pieces match in length?
3. Do notches and markings still align?
4. Have you blended consistently on all relevant pieces?
5. Does the new line follow the original shape of the pattern?
A few minutes here saves a lot of confusion later.
Common mistakes to avoid
Drawing straight lines instead of following the original curve
Sharp, sudden jumps between sizes
Forgetting to adjust matching pieces
Creating mismatched side seams
Ignoring grainlines
Blending only one side of the garment
Skipping the toile